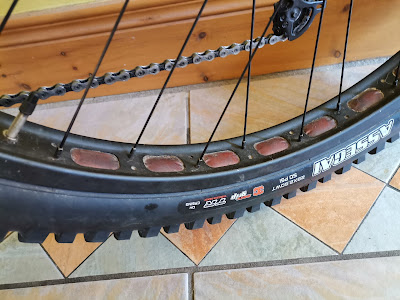
I left a wheel into a shop a while ago to be re-spoked and fixed up. It was a bit rough and long overdue some attention. It was running as a Tubeless setup on Surly Rabbit Hole 29"s with a 2.5 inch tyre.
When I collected the wheel from the shop it had been set up tubed not Tubeless and the chap explained that he had to put on different rim tape and that the wheel was not designed for running Tubeless.
I thought O.K. no worries if that's the story but when I got home I realised that this particular bike which I generally use for cycling in areas of Gorse (Furze) and brambles and such like would now be of little use with a tubed wheel. Besides, it was previously running Tubeless before it went into the shop.
It would constantly puncture now at the inner tube from the rough terrain and thorns and Gorse spikes where I use this "Mud Plugger" bike.
I did a bit of research and seemingly a specific wheel manufacturer is no longer using Rim Tape in its Tubeless wheels but is instead using OEM unbranded Gorilla Tape.
So being verifiably stupid I bought a thick roll of Gorilla Tape to try this myself on the Wheel which the shop had set up "tubed".
I removed the tyre and tube and got a Tubeless valve ready. Then I left the existing thick rim tape which covers the holes in the Surley wheel rim in place. I then cleaned the rim and this tape with thinners and dried it off.
Next I applied a layer of Gorilla tape around the wheel, overlapping where I started by about three inches.
If you don't have a wheel like the Surley which has large holes in the body of the rim I would suggest removing all trace of any existing rim tape. In my particular case I left the existing rim tape because I think it is needed for support. I'm not convinced that the Gorilla Tape alone on this type of wheel would be strong enough or hold up well.
I put the Gorilla tape in place while pulling it nice and tight as I went along. Next I used my fingers and thumbs going around the rim twice and firmly pushing down on the tape to ensure it was nice and flat on the rim.
I also made sure while taping the rim that the strip of tape was wide enough to cover the entire rim but not the channel that the tyre sits in. This channel/slot in the rim was left clear of tape so the tyre would fit and interface on the wheel properly.
The Gorilla Tape I used was a wide strip, a bit too wide, so I just cut a little "nick" where the tape started to make it the right width for the rim and pulled this little strip off as I went along. It worked perfectly. Then I put one side of the tyre back onto the wheel.
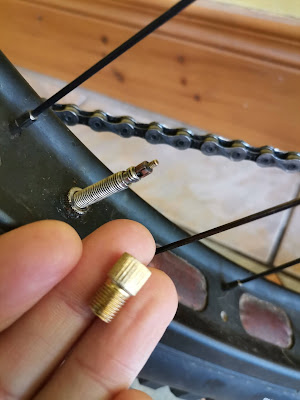
Using a scribe I put a tiny hole into the slot on the rim for the valve and then twisted the valve carefully into position through this hole as if I was twisting in a screw and I tightened up the valve nut tightly by hand.
I put the other side of the tyre back onto the wheel and when there was just a litle gap at the bottom left before the tyre was fully on and seated onto the rim I poured in four ounces of sealant before pushing the tyre fully home onto the rim.
This wasn't at all messy and not a single drop of sealant fell out. Once the last small gap in the tyre is placed at the bottom near the floor it's easy to pour in the sealant and seat the tyre without spilling it.
My track pump couldn't get the tyre properly inflated. Sometimes this is a problem when tyring to initially inflate a Tubeless setup so I quickly headed to the local Garage and used their compressed air pump to pump up the tyre. I initially pumped it well past specification just to get the tyre to "pop" onto the rim and get it seated properly.
Because the Valve was a Presta type I put on a little adapter which changes it to a schrader type before heading to the Garage. These are handy to have and can be got online cheaply for about a euro each.
I then "twirled" the wheel around to get a nice layer of sealent spread around the inside of the wheel and the rim and finally I bounced and spun the wheel up and down a bit off the ground. Because I was at a Garage forecourt this got me a few funny looks.
The wheel has been on a few days now set up as Tubeless and it hasn't lost any air pressure at all. When I initially thought about it the process seemed daunting but when I broke it down into simple stages it turned out to be a very easy job to do.
Simple in fact so don't be afraid to have a go at converting any wheels you may have that you might like to use as Tubeless. As far as I am aware almost all modern wheels will accept a Tubeless ready tyre and I believe that many tyres not certified as Tubeless ready will also happily run set up as Tubeless.
I intend to test this out next week by converting non Tubeless certified tyres to a Tubeless setup and check them for "burping".
All I required was Gorilla Tape, a Tubeless valve, Stans Tire Sealant and a valve adapter. If you are using a Schrader type valve you won't even need the valve adapter. The tyre I used for this was a Maxxis Assegai "Tubeless ready."
I don't advise trying this at home without having either an air compressor or having a Garage nearby just in case your track pump can't do the initial tyre inflation, which is a regular occurance I am led to believe.
Keep the wheels turning......


